Passprint

Passport photo how-to

How to change a passport photo background to white

Most passport and visa photos need a plain white or near-white backdrop. Replace walls and shadows cleanly, then re-check crop and face height so the photo still meets ICAO and country rules.

AI white replacementShadow cleanupCrop after swap
Passprint how to change passport photo background to white workflow: upload portrait, AI background removal, compliant sizing, and print-ready A4 sheet
Common mistakes

White backgrounds go wrong in the details halos, shadows, and over-editing

A “mostly white” wall with grey corners or hair cutouts with coloured fringes still fails review. Aim for a uniform tone and natural hair edges — not a harsh magic-wand cutout. After the swap, always re-check crop using the crop how-to and the destination country guide so face height remains compliant. Passprint automates the entire workflow from upload to print-ready sheet in just a few clicks.

Studio challenge

Leaving wall shadows or grey gradients

Standing too close to the wall or using overhead light creates a shadow halo. Reviewers treat uneven tones as a non-compliant background.

01 / 03
Studio challenge

Jagged cutouts and coloured hair fringes

Aggressive manual erase tools leave green or pink edges around hair. Soft subject segmentation (as in Passprint) looks more natural and passes contrast checks more reliably.

02 / 03
Studio challenge

Changing the face while fixing the background

Beauty filters, whitening skin, or reshaping features while editing the backdrop can violate alteration rules. Replace the background only; keep the face as captured.

03 / 03
Background replacement reference

Before/after white swap and what “compliant white” means

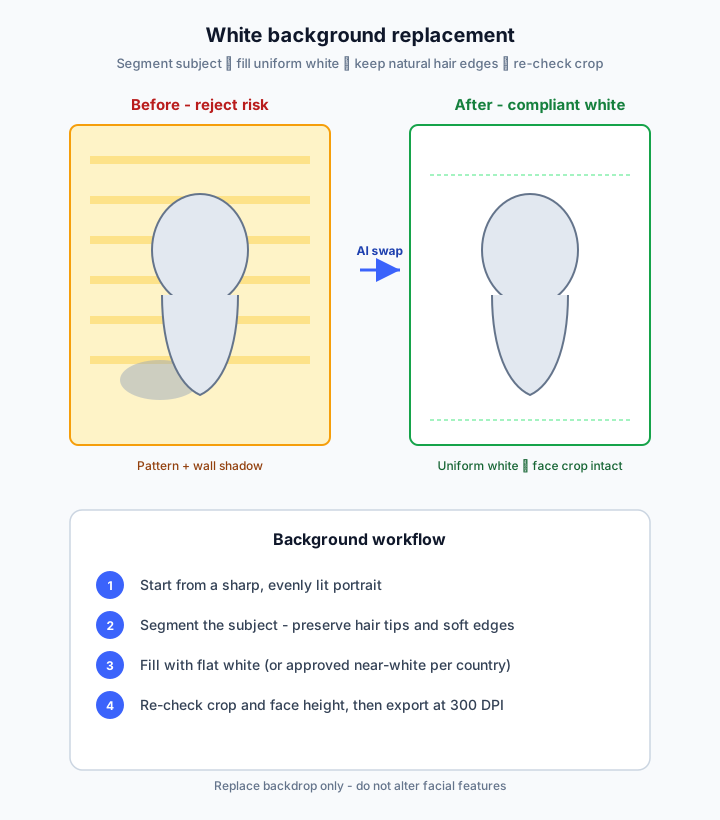
Uniform white (or approved near-white) maximises contrast with hair and clothing. The diagram shows the reject-risk patterns you should remove, then the clean field you want before re-checking crop.

Before and after diagram of passport photo background replacement from a patterned wall with shadows to a uniform white background with clean subject edges
Replace busy walls and shadows with flat white — then re-check face crop.

Background approaches compared

SpecPassprint AI whiteManual Photoshop / CanvaShoot on white paper only
SpeedSeconds inside one processing creditMinutes to hours of maskingDepends on setup quality
Hair edgesSoft subject segmentationSkill-dependent; fringes commonNatural if lit well
Shadow cleanupReplaces shadowed walls entirelyClone / heal requiredAvoid by standing off the wall
Face alteration riskBackground + crop onlyEasy to over-edit faceNone from backdrop
Crop after changePreset framing in same workflowMust re-measure face heightStill need size crop
Learn moreWhite background guideBackground hubTake photo at home

How to whiten the background without failing review

Start from a clear, well-lit portrait

Sharp eyes and even face lighting make background removal cleaner. Soft, underexposed faces produce muddy hair mattes. If you are still shooting, follow the at-home capture guide for front light and distance from the wall so shadows never hit the backdrop.

Remove the existing background carefully

Segment the subject from walls, outdoors, or patterned backdrops. Avoid erasing hair tips, eyeglasses frames, or soft clothing edges. Jagged magic-wand selections are a common DIY failure — prefer tools that preserve fine strands.

Fill with uniform white (or approved near-white)

Apply a flat white that contrasts with hair and clothing. Some countries allow light grey or cream — check local rules before choosing off-white tones. India and many US forms prefer plain white; UK and some Schengen packs may accept light backgrounds. When unsure, white is the safest default.

Re-check crop and face height

After the swap, confirm the head is still centred and sized correctly for the destination country and ICAO framing. Background replacement can change how edges sit against the frame. Use the crop how-to or a Passprint size preset rather than guessing percentages.

What counts as photo manipulation

Sizing, cropping, and standardising the background are normal studio practices. Changing facial features, digitally adding makeup, or heavily smoothing skin can violate alteration rules. Keep edits to background and crop; leave identity features as captured.

Shadows, halos, and grey corners

Reviewers reject photos with a grey gradient behind one shoulder or a dark oval under the chin on the backdrop. If your source has heavy wall shadows, full replacement is usually better than brightening patches. Passprint replaces the field uniformly so tone stays consistent.

Clothing contrast after whitening

White shirts can disappear into a white field. If contrast collapses, re-shoot in a mid-tone top when possible. Do not paint false colour onto clothing in the editor — that can look like prohibited alteration.

Finish in Passprint

Upload once — Passprint replaces the background with white, applies a size preset, and exports a 300 DPI print sheet without Photoshop masking. Soft-start from try with a standard 35×45 preset, or open the white background guide for studio-oriented workflow detail.

Official and ICAO context

ICAO Doc 9303 emphasises uniform, light backgrounds that keep the face clearly separable. National pages publish exact tone preferences. Cross-check the ICAO hub and your country guide after you whiten so framing and size still match the application you are filing.

Whiten and size in one step

Replace the background, apply a country crop, and download a print-ready sheet.

Try Passprint free

Step-by-step

How to make a passport photo background white

Start with the best capture you can, replace the backdrop with uniform white, then confirm crop and contrast before you print or upload.

1

Start from a clear, well-lit portrait

Sharp eyes and even face lighting make background removal cleaner. Follow the at-home capture guide if you are still shooting the photo.

Person taking a selfie to upload as passport photo
Upload Photo
2

Remove the existing background

Segment the subject from walls, outdoors, or patterned backdrops. Avoid erasing hair tips or soft clothing edges.

Portrait being AI-processed
Processing
3

Fill with uniform white (or approved near-white)

Apply a flat white that contrasts with hair and clothing. Some countries allow light grey — check local rules before choosing cream tones.

Processed passport photo with compliant background
Original selfie before processing
25 mm
35 mm ISO
35 mm
25 to 35 mm (50 to 69%)
4

Re-check crop and face height

After the swap, confirm the head is still centred and sized correctly for the destination country and ICAO framing.

For Print (A4).pdf300 DPI

Passport Size Photos

A4 · 210 × 297 mm · 35 × 45 mm

5

Finish in Passprint

Upload once — Passprint replaces the background with white, applies a size preset, and exports a 300 DPI print sheet without Photoshop masking.

Background toolkit

White backgrounds, without Photoshop.

Segment the subject, apply uniform white, then re-check crop — the same pipeline as the white background studio guide.

AIRemoval
WhiteDefault tone
1Pass crop
01
Background

One-click white replacement

Busy walls and outdoor scenes become a flat white backdrop.

02
Crop

Framing after swap

Head size adjusts after the background change so the crop stays compliant.

03
Export

Export for print or upload

300 DPI sheets for printers, or a single file for online forms.

White background FAQ

Changing passport photo background to white — FAQ

White (or near-white) backgrounds are required by most passport authorities so the face contrasts clearly for human and automated checks.

Passprint uses AI-assisted processing for background replacement, face framing, and sizing. Final acceptance is decided by the issuing authority — always verify against the official references on this page and inspect your printed sheet before submission.

Last reviewed: July 31, 2026

Need a white background now? Replace it in seconds.

AI white-background replacement with passport sizing in one upload.