Passprint

Passport photo how-to

How to crop a passport photo

Passport crops are not Instagram squares. You need the right millimetre size, face-height band, and centred head — Passprint applies country presets so the crop matches official rules.

Country size presetsFace-height framing300 DPI export
Passprint how to crop a passport photo workflow: upload portrait, AI background removal, compliant sizing, and print-ready A4 sheet
Common mistakes

Bad crops cause quiet rejections even when the portrait looks fine

Offices reject photos when the head is too small, cut off at the chin, or the image is stretched to fit a template. Crop to the official aspect ratio — never squeeze the face. Confirm destination size on the passport photo size hub first, then use this guide for framing mechanics, or let Passprint apply a country preset automatically. Passprint automates the entire workflow from upload to print-ready sheet in just a few clicks.

Studio challenge

Head too small or too large in the frame

ICAO guidance and many countries expect the chin-to-crown distance to fill most of the image height (often around 70–80%). A tiny face in a large frame fails automated checks.

01 / 03
Studio challenge

Wrong aspect ratio or stretched pixels

Forcing a 35×45 mm portrait into a square 2×2 template (or the reverse) without a proper crop warps proportions. Always crop to the destination size, then resize at 300 DPI.

02 / 03
Studio challenge

Cutting ears, crown, or leaving uneven margins

Ears should normally be visible; leave a small margin above the hair. Centre the face horizontally so one shoulder is not cropped tighter than the other.

03 / 03
Crop framing reference

Aspect ratios, face-height bands, and size destinations

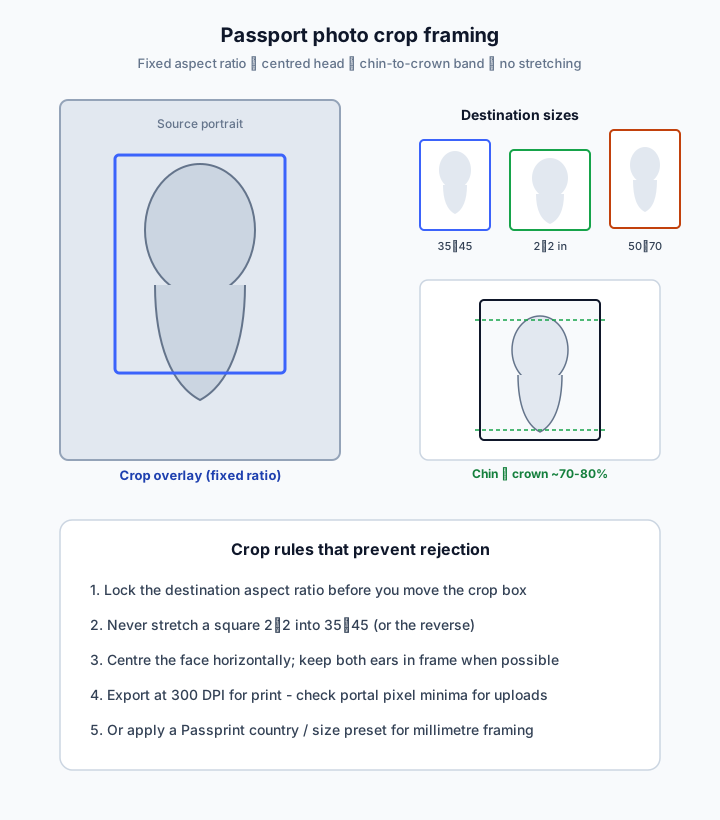
Lock the correct aspect ratio before you move the crop box. The diagram shows how one portrait feeds 35×45, 2×2, and 50×70 outputs without stretching.

Diagram showing a source portrait with a fixed-ratio crop overlay and destination frames for 35 by 45 millimetre, 2 by 2 inch, and 50 by 70 millimetre passport photos with a chin-to-crown face-height band
Fixed-ratio crop first — then face-height framing for the destination country.

Crop targets by common passport size

Spec35×45 mm2×2 in (US)50×70 mm (Canada)
Outer size35×45 mm2×2 in (51×51 mm)50×70 mm
Aspect ratio7:9 portrait1:1 square5:7 portrait
Face / head height~70–80% of height (ICAO-style)1–1⅜ in chin to crown31–36 mm chin to crown
Approx. pixels @ 300 DPI413×531 px600×600 px591×827 px
Typical marketsIndia, UK, Schengen+US passport & visaCanada IRCC
Open size guide35×45 mm guide2×2 in guide50×70 mm guide

How to crop without failing size or face-height checks

Confirm the required photo size first

Look up the destination before you crop: India, the UK, and Schengen often use 35×45 mm; the United States uses 2×2 inches; Canada uses 50×70 mm with a published face-height millimetre range. Cropping to the wrong outer size wastes the whole workflow. Use the size hub and country guides as the source of truth for dimensions.

Crop to the correct aspect ratio only

Use a fixed-ratio crop matching the official dimensions. Do not stretch or squish the image to fill a box — that changes face proportions and is easy for reviewers to spot. If you only have a square US crop and need 35×45, return to the original uncropped portrait and re-crop; never stretch the square.

Centre the face and set head height

Place the head in the middle of the frame horizontally. Aim for chin-to-crown filling the band your country or ICAO expects, with a little space above the hair. Canada’s 31–36 mm face height is especially strict — a generic “zoom until it looks good” crop often fails IRCC even when the outer 50×70 size is correct.

Ears, shoulders, and margins

Keep both ears visible when hairstyle allows. Avoid cutting the crown or chin. Shoulders should appear balanced; uneven side margins make the photo look off-centre. Jewelry and hair that obscure the jawline can also cause problems after a tight crop.

Export at 300 DPI for print

Printed passport photos should be sharp at 300 DPI. Digital uploads may list minimum or maximum pixel dimensions — check the form before submitting. Export from Passprint at print quality, then downscale only if a portal requires a smaller JPEG.

Order of operations with background replacement

You can crop before or after whitening the background if you re-check face height afterward. Background swaps can slightly change perceived edges around hair. Passprint applies background replacement and crop in one workflow so head size stays aligned with the selected preset.

Converting between country sizes

Moving from US 2×2 to India/UK 35×45 (or Canada 50×70) requires a fresh crop from the original file. Aspect ratios differ; “fit to frame” stretch tools are the wrong approach. Keep the master portrait and re-run the correct Passprint preset for each destination.

Manual editors vs Passprint presets

Free editors work if you lock aspect ratio, measure face height carefully, and export at the right DPI. Passprint is faster because country presets and face detection handle millimetre sizing and multi-copy print layout together — useful when you process more than one application size.

Soft start when you are unsure of the size

If you are still confirming the destination, try a standard 35×45 preset as a starting point for international rectangle countries, then switch once you open the matching size or country page. Always verify against official references linked on those pages before you submit.

Crop with a country preset

Upload once and let Passprint frame the face to millimetre size — then arrange a print sheet.

Open passport photo maker

Step-by-step

How to crop a passport photo correctly

Confirm the destination size first, crop without stretching, check face height, then export at print resolution — or let Passprint apply the preset automatically.

1

Confirm the required photo size

Look up your destination: India/UK/Schengen often use 35×45 mm; the US uses 2×2 in; Canada uses 50×70 mm. Cropping to the wrong size wastes the whole workflow.

Person taking a selfie to upload as passport photo
Upload Photo
2

Crop to the correct aspect ratio only

Use a fixed-ratio crop matching the official dimensions. Do not stretch or squish the image to fill a box — that changes face proportions.

Portrait being AI-processed
Processing
3

Centre the face and set head height

Place the head in the middle of the frame. Aim for chin-to-crown filling the band your country or ICAO expects, with a little space above the hair.

Processed passport photo with compliant background
Original selfie before processing
25 mm
35 mm ISO
35 mm
25 to 35 mm (50 to 69%)
4

Export at 300 DPI for print

Printed passport photos should be sharp at 300 DPI. Digital uploads may also require minimum pixel dimensions — check the form before submitting.

For Print (A4).pdf300 DPI

Passport Size Photos

A4 · 210 × 297 mm · 35 × 45 mm

5

Or crop automatically in Passprint

Upload once, pick a country or size preset, and Passprint frames the face, applies the millimetre crop, and builds a multi-copy print sheet.

Accurate cropping tools

Millimetre crops, not guesswork.

Country presets apply the right aspect ratio and face-height band so you do not stretch portraits into the wrong template.

35×45mm common
2×2US inch
50×70Canada mm
01
Presets

Country & size presets

India, UK, US, Canada, Schengen, and standard size pages share the same framing engine.

02
ICAO

Face-height targeting

Head size lands in the ICAO band before you export.

03
Print

Layout after crop

Place multiple copies on one A4 sheet once the single crop is correct.

Crop FAQ

Passport photo cropping — FAQ

Correct cropping means the right dimensions, face height, and resolution — not just cutting a rectangle around the face.

Passprint uses AI-assisted processing for background replacement, face framing, and sizing. Final acceptance is decided by the issuing authority — always verify against the official references on this page and inspect your printed sheet before submission.

Last reviewed: July 31, 2026

Skip manual millimetre crops. Use Passprint presets.

Face-height framing for India, UK, US, Canada, and more — plus A4 print layouts.